

Google Cloud Kubernetes Deployment
This article describes the deployment of a trial SFTPPlus engine using an already created Google Cloud Platform Kubernetes Engine service (GKE).
- Published
- 2021-08-02

SFTP and HTTPS file server cluster overview
This article describes the deployment of a trial SFTPPlus engine using an already created Google Cloud Platform Kubernetes Engine service (GKE).
The example Kubernetes YAML file can be found in our GitHub SFTPPlus Kubernetes repository while the container source available at our GitHub SFTPPlus Docker repository.
The actual user data is persisted using a single Google Cloud Storage bucket.
You can adapt the example from this article to any other Kubernetes system, like OpenShift, Azure Kubernetes Service (AKS) or Amazon AWS.
We would love to hear your feedback. Get in touch with us for comments or questions.
Final result
Once completing the steps in this guide, you will have an SFTPPlus application with the following services:
- Port 10020 - HTTPS web management interface
- Port 443 - HTTPS server for end-user file management
- Port 22 - SFTP server for end-user file access
All these services will be available via the public IP address associated with your load balancer.
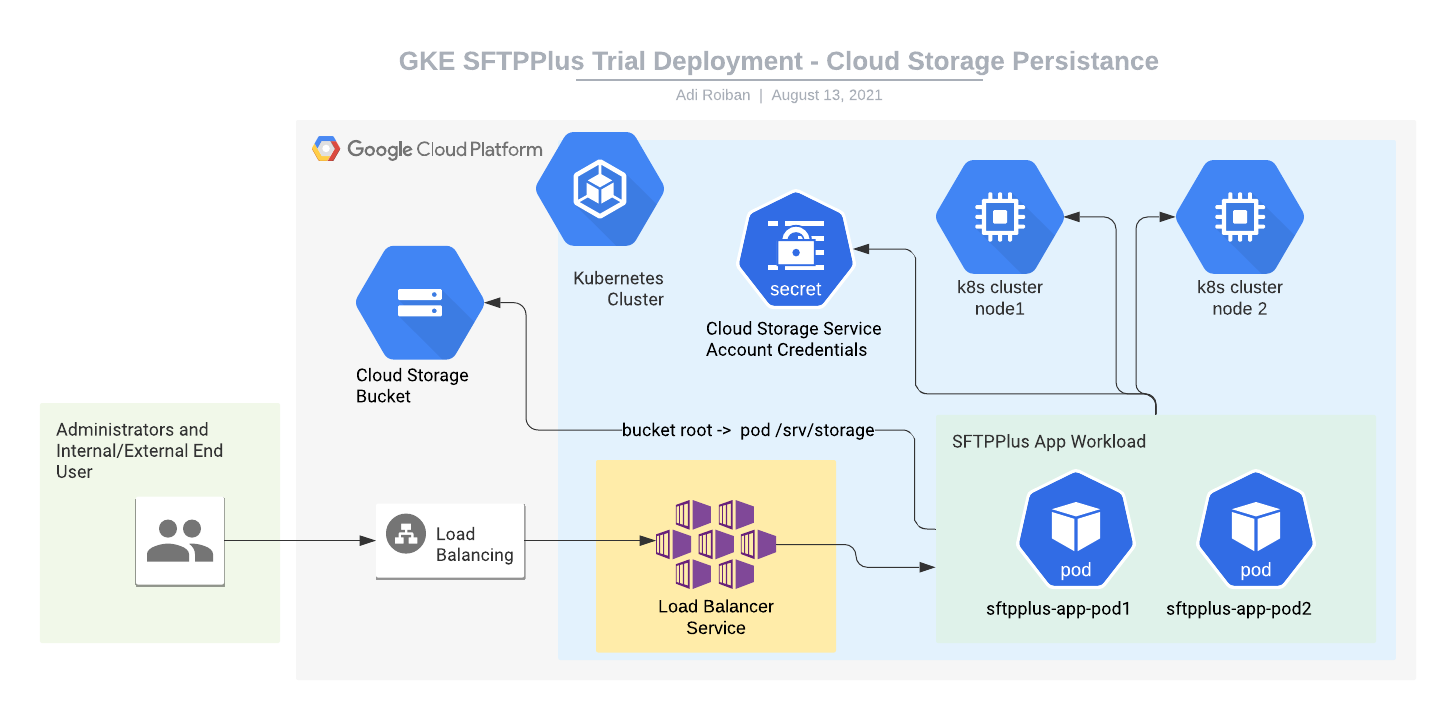
The Google Cloud storage bucket is made available inside each container as the /srv/storage local path.
SFTPPlus also supports legacy FTP, explicit or implicit FTPS or plain HTTP file access. They are not included in this guide to reduce the complexity of the provided information and configuration.
Deployment components
To deploy SFTPPlus into the cluster we will use the following components:
- The SFTPPlus Trial container image hosted at Docker Hub.
- A Google Kubernetes Engine that was already created.
- A Google Cloud Storage bucket to persist user data. These are the files and directories available to end-users. You can create a new bucket or use an existing one.
- A Google Cloud service accounts with write access to the storage bucket.
- Kubernetes cluster secret to store the Google Cloud Storage credentials. This will be used by Kubernetes pods to access the persistence storage. Instructions for creating this are provided below.
- A Kubernetes workload for hosting the SFTPPlus application. Instructions for creating this are provided below.
- A Kubernetes Load Balancer server for connecting the application to the Internet. Instructions for creating this are provided below.
Cloud storage secure access from Kubernetes cluster
Since the persistent data is stored outside the cluster, we need to setup the authentication to your cloud storage bucket from within the Kubernetes cluster.
We assume that you will use the Google Cloud console to create the storage bucket and the Service account.
Once the Service account is created, create a new credentials key or associate with an existing one.
You will need to upload/copy the Service account's credential key to your cloud shell. For this example we assume that the file is named gcs-credentials.json and the secret is created using the sftpplus.gcs.credentials name. Then it can be imported into Kubernetes using the following command line:
kubectl create secret generic sftpplus.gcs.credentials \
    --from-file  gcs-credentials.json
Load Balancer and Internet access
For accessing the SFTPPlus over the Internet we will use a standard Kubernetes Load Balancer service .
Below, you can find an example YAML file named sftpplus-service.yaml that can be copied to your cloud console.
apiVersion: v1
kind: Service
metadata:
    finalizers:
        - service.kubernetes.io/load-balancer-cleanup
    labels:
        app: sftpplus-app
    name: sftpplus-app-load-balancer
    namespace: default
spec:
    externalTrafficPolicy: Cluster
    ports:
        - name: 10020-to-10020-tcp
          nodePort: 30500
          port: 10020
          protocol: TCP
          targetPort: 10020
        - name: 443-to-10443-tcp
          nodePort: 32013
          port: 443
          protocol: TCP
          targetPort: 10443
        - name: 22-to-10022-tcp
          nodePort: 32045
          port: 22
          protocol: TCP
          targetPort: 10022
    selector:
        app: sftpplus-app
    sessionAffinity: None
    type: LoadBalancer
If you want to have the SFTPPlus services available on other port numbers, you can do so by updating the port configuration values. nodePort and targetPort don't need to be updated.
Create or update the load balancer service with the following command.
kubectl apply -f sftpplus-service.yamlKubernetes SFTPPlus application deployment
The SFTPPlus application will be deployed as a container inside a pod.
The configuration and data is persisted outside of the cluster, using a cloud storage bucket
The deployment to the cluster can be done using the following YAML file named sftpplus-workload.yaml.
apiVersion: apps/v1
kind: Deployment
metadata:
    labels:
        app: sftpplus-app
    name: sftpplus-app
    namespace: default
spec:
    progressDeadlineSeconds: 600
    replicas: 1
    revisionHistoryLimit: 10
    selector:
        matchLabels:
            app: sftpplus-app
    strategy:
        rollingUpdate:
            maxSurge: 25%
            maxUnavailable: 25%
        type: RollingUpdate
    template:
        metadata:
            labels:
                app: sftpplus-app
        spec:
            containers:
                - env:
                      - name: GCS_BUCKET
                        value: sftpplus-trial-srv-storage
                      - name: GOOGLE_APPLICATION_CREDENTIALS
                        value: /srv/gcs-credentials/gcs-credentials.json
                  image: proatria/sftpplus-trial:4.12.0-cloud
                  imagePullPolicy: Always
                  lifecycle:
                      preStop:
                          exec:
                              command:
                                  - fusermount
                                  - -u
                                  - /srv/storage
                  name: sftpplus-trial
                  resources: {}
                  securityContext:
                      privileged: true
                  terminationMessagePath: /dev/termination-log
                  terminationMessagePolicy: File
                  volumeMounts:
                      - mountPath: /srv/gcs-credentials
                        name: gcs-credentials-key
            dnsPolicy: ClusterFirst
            restartPolicy: Always
            schedulerName: default-scheduler
            securityContext: {}
            terminationGracePeriodSeconds: 30
            volumes:
                - name: gcs-credentials-key
                  secret:
                      defaultMode: 420
                      secretName: sftpplus.gcs.credentials
You should replace sftpplus-trial-srv-storage with the name of your storage bucket.
This does the following:
- Creates a new container using the SFTPPlus trial image hosted on DockerHub.
- Will give access to cloud storage bucket from inside the container at path
/srv/storage. - Will make the Service account credentials available in the
/srv/gcs-credentials/gcs-credentials.jsonfile, available via the cluster secrets.
With the YAML file available in the cloud console, you can create or upload the workload by using the following command.
kubectl apply -f sftpplus-workload.yaml