
Contents
Deployment Foundation
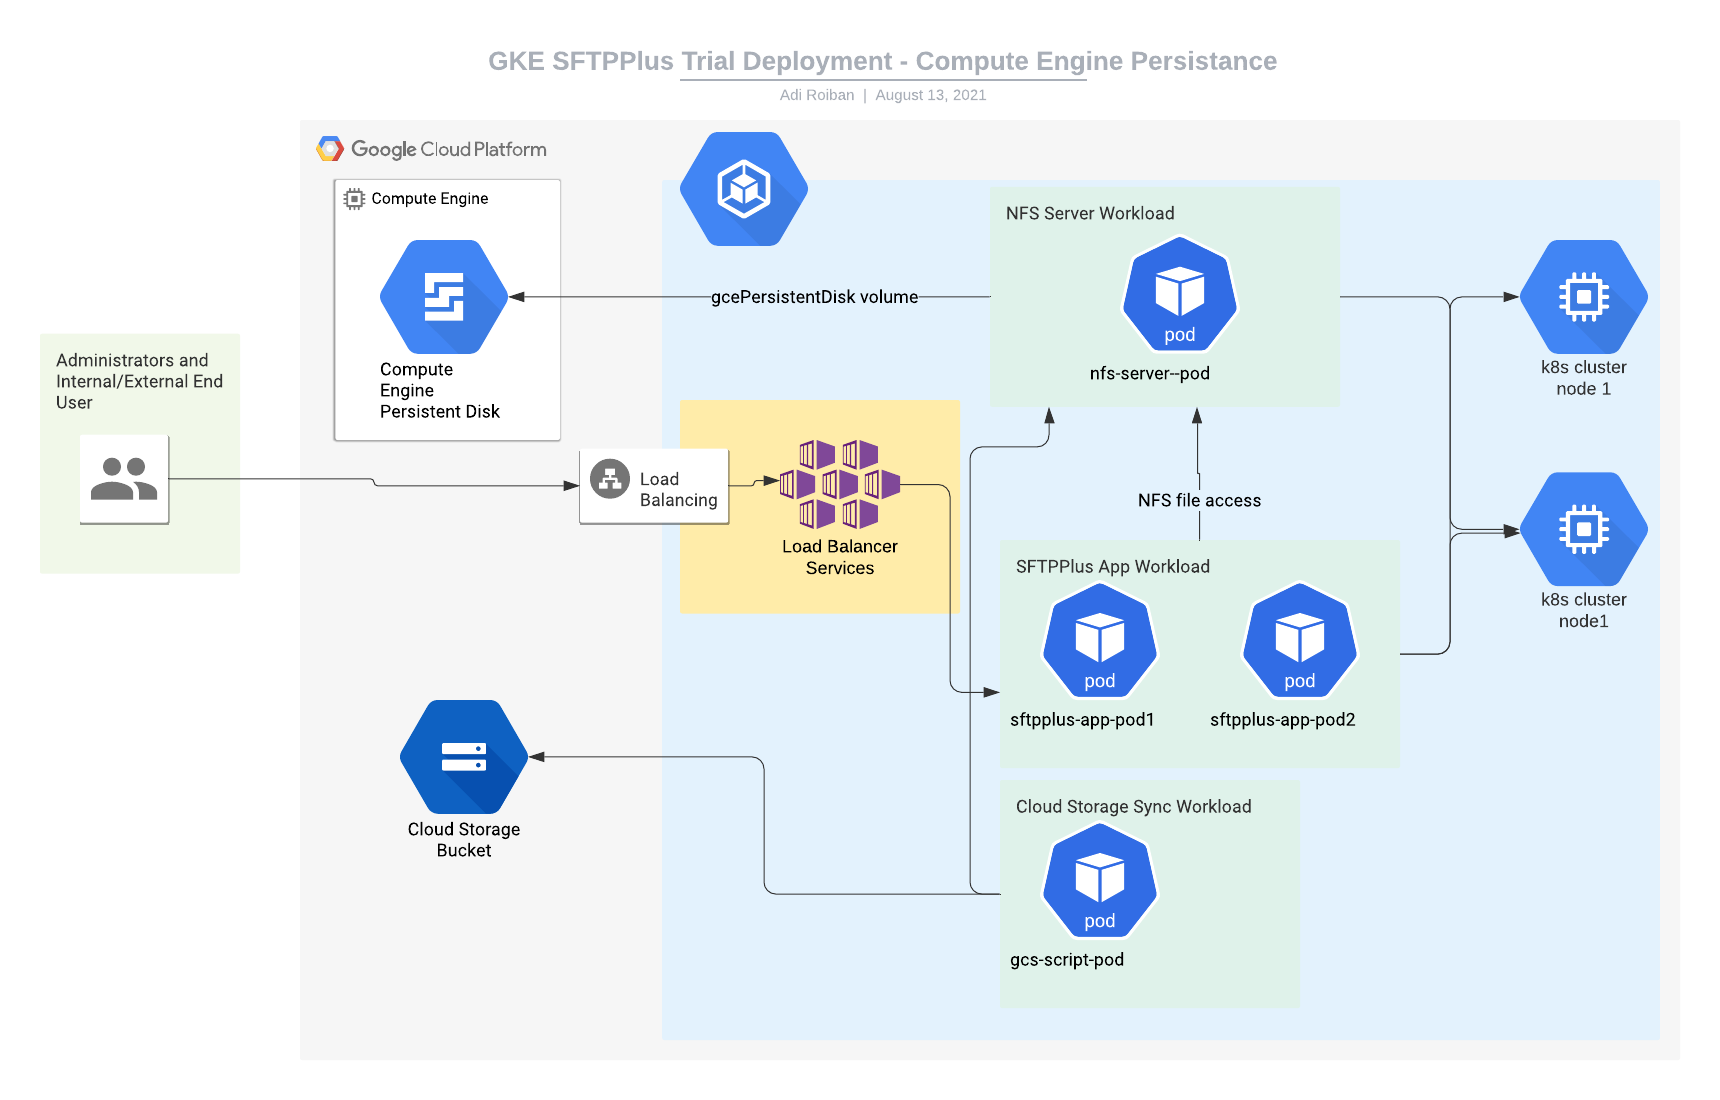
This article describes the deployment of a trial SFTPPlus engine using the Google Cloud Platform Kubernetes Engine service, with the persisted data shared between the cluster nodes using an NFS server that is also hosted inside the cluster.
The deployment is done in a single zone.
The container image used in this example is the DockerHub SFTPPlus Trial.
The source of the container image is available from our public GitHub SFTPPlus Docker repository.
The example Kubernetes YAML file can be found in our GitHub SFTPPlus Kubernetes repository
The actual user data is persisted using a single Google Cloud Compute Engine storage disk.
The information from this article can be adapted to use any other container image or deployed into any other Kubernetes Engine service, like Azure Kubernetes Service (AKS) or Amazon Elastic Kubernetes Service.
It assumes that you already have a working Kubernetes cluster.
It assumes that the SFTPPlus application version and configuration is managed and versioned using the container image.
For any comments or questions, don't hesitate to get in touch with us.
Final result
Once completing the steps in this guide, you will have an SFTPPlus application with the following services:
- Port 10020 - HTTPS web based management console
- Port 443 - HTTPS end-user file management service
- Port 22 - SFTP end-user service
- Port 80 - Let's Encrypt Validation service
All these services will be available via your cluster IP address.
The Compute Engine disk is made available inside each container as the /srv/storage local path.
Moving parts
For implementing the SFTPPlus service we will be using the following parts:
- The SFTPPlus Trial container image hosted at Docker Hub.
- A Google Kubernetes Engine with at least 2 nodes, each node with a minimum of 2 GB of memory and 100GB of storage. This is a prerequisite for this article.
- Kubernetes persistence volume (and persistence volume claim) to store the user data. Instructions for creating this are provided below.
- A Kubernetes Load Balancer service for connecting the application to the Internet. Instructions for creating this are provided below.
- A Kubernetes Cluster IP service for allowing concurrent access to cluster pods to the persistence disk. Instructions for creating this are provided below.
- A Kubernetes workload for hosting the NFS server that will make the data from the persistence disk available to multiple pods inside the cluster. Instructions for creating this are provided below.
- A Kubernetes workload for hosting the SFTPPlus application. Instructions for creating this are provided below.
Kubernetes load balancer and Internet access
This section describes the process of creating a Kubernetes load balancer service to allow external Internet access to the SFTPPlus application.
It assumes that you will upload the following YAML file named sftpplus-service.yaml to your cloud console:
apiVersion: v1
kind: Service
metadata:
  finalizers:
  - service.kubernetes.io/load-balancer-cleanup
  labels:
    app: sftpplus-app
  name: sftpplus-app-load-balancer
  namespace: default
spec:
  externalTrafficPolicy: Cluster
  ports:
  - name: 443-to-10443-tcp
    nodePort: 32013
    port: 443
    protocol: TCP
    targetPort: 10443
  - name: 22-to-10022-tcp
    nodePort: 32045
    port: 22
    protocol: TCP
    targetPort: 10022
  selector:
    app: sftpplus-app
  sessionAffinity: None
  type: LoadBalancer
If you want to make the SFTPPlus services available on other port numbers, you can do so by updating the port configuration values. nodePort and targetPort don't need to be updated.
With the YAML file available in the cloud console, you can create the service by using the following command:
kubectl create -f sftpplus-service.yaml
Cluster NFS service
To allow multiple pods to access the same persistence disk at the same time, we are going to create an internal ClusterIP service.
It assumes that you will upload the following YAML file named nfs-service.yaml to your cloud console:
apiVersion: v1
kind: Service
metadata:
  labels:
    role: nfs-server
  name: nfs-server
  namespace: default
spec:
  ports:
  - name: 2049-to-2049-tcp
    port: 2049
    protocol: TCP
    targetPort: 2049
  - name: 20048-to-20048-tcp
    port: 20048
    protocol: TCP
    targetPort: 20048
  - name: 111-to-111-tcp
    port: 111
    protocol: TCP
    targetPort: 111
  selector:
    role: nfs-server
  sessionAffinity: None
  type: ClusterIP
With the YAML file available in the cloud console, you can create the service by using the following command:
kubectl create -f nfs-service.yaml
Persistence provisioning
Here we create 2 persistent volume claims:
- One for the actual persisted disk available to the NFS server
- Another one to access the NFS server as a persistent disk from multiple pods.
It assumes that you will upload the following YAML file named nfs-pv.yaml to your cloud console:
apiVersion: v1
kind: PersistentVolumeClaim
metadata:
  name: nfs-disk-claim
spec:
  accessModes:
    - ReadWriteOnce
  resources:
    requests:
      storage: 10Gi

---

apiVersion: v1
kind: PersistentVolume
metadata:
  name: nfs-pv
spec:
  capacity:
    storage: 10Gi
  accessModes:
    - ReadWriteMany
  nfs:
    server: NFS-CLUSTER-IP
    path: "/"

---

kind: PersistentVolumeClaim
apiVersion: v1
metadata:
  name: nfs-pvc
spec:
  accessModes:
    - ReadWriteMany
  storageClassName: ""
  resources:
    requests:
      storage: 10Gi
You should replace the NFS-CLUSTER-IP with the internal cluster IP generated after the execution of the nfs-service.yaml file.
With the YAML file available in the cloud console, you can create the service by using the following command:
kubectl create -f nfs-pv.yaml
Cluster NFS server workload
Next we will create the actual NFS server workflow that will connect to the Compute Engine disk and make it available over the internal cluster network.
It assumes that you will upload the following YAML file named nfs-app.yaml to your cloud console:
apiVersion: apps/v1
kind: Deployment
metadata:
  labels:
    app: nfs-server
  name: nfs-server
  namespace: default
spec:
  progressDeadlineSeconds: 600
  replicas: 1
  revisionHistoryLimit: 10
  selector:
    matchLabels:
      role: nfs-server
  strategy:
    rollingUpdate:
      maxSurge: 25%
      maxUnavailable: 25%
    type: RollingUpdate
  template:
    metadata:
      labels:
        role: nfs-server
    spec:
      containers:
      - image: gcr.io/google_containers/volume-nfs:0.8
        imagePullPolicy: IfNotPresent
        name: nfs-server
        ports:
        - containerPort: 2049
          name: nfs
          protocol: TCP
        - containerPort: 20048
          name: mountd
          protocol: TCP
        - containerPort: 111
          name: rpcbind
          protocol: TCP
        resources: {}
        securityContext:
          privileged: true
        terminationMessagePath: /dev/termination-log
        terminationMessagePolicy: File
        volumeMounts:
        - mountPath: /exports
          name: nfs-server-disk
      dnsPolicy: ClusterFirst
      restartPolicy: Always
      schedulerName: default-scheduler
      securityContext: {}
      terminationGracePeriodSeconds: 30
      volumes:
      - name: nfs-server-disk
        persistentVolumeClaim:
          claimName: nfs-disk-claim
With the YAML file available in the cloud console, you can create the service by using the following command:
kubectl create -f nfs-app.yaml
Cluster SFTPPlus application workload
This section describes the creation and configuration of a workload that will run a pod hosting the SFTPPlus application.
It assumes that you will upload the following YAML file named sftpplus-workload.yaml to your cloud console:
apiVersion: apps/v1
kind: Deployment
metadata:
  labels:
    app: sftpplus-app
  name: sftpplus-app
  namespace: default
spec:
  progressDeadlineSeconds: 600
  replicas: 1
  revisionHistoryLimit: 10
  selector:
    matchLabels:
      app: sftpplus-app
  strategy:
    rollingUpdate:
      maxSurge: 25%
      maxUnavailable: 25%
    type: RollingUpdate
  template:
    metadata:
      labels:
        app: sftpplus-app
    spec:
      containers:
      - image: proatria/sftpplus-trial
        imagePullPolicy: Always
        name: sftpplus-trial
        resources: {}
        securityContext:
          privileged: true
        terminationMessagePath: /dev/termination-log
        terminationMessagePolicy: File
        volumeMounts:
        - mountPath: /srv/storage
          name: nfs-server
      dnsPolicy: ClusterFirst
      restartPolicy: Always
      schedulerName: default-scheduler
      securityContext: {}
      terminationGracePeriodSeconds: 30
      volumes:
      - name: nfs-server
        persistentVolumeClaim:
          claimName: nfs-pvc
With the YAML file available in the cloud console, you can create the workload by using the following command:
kubectl create -f sftpplus-workload.yaml