
Contents
Introduction
This article describes deploying the SFTPPlus application to the Google Kubernetes engine (GKE) using a single pod for which the configuration and data is persisted outside the cluster using a Compute Engine storage disk.
The container image used in this example is the DockerHub SFTPPlus Trial.
The source of the container image is available from our public GitHub SFTPPlus Docker repository.
The example Kubernetes YAML file can be found in our GitHub SFTPPlus Kubernetes repository
You can use the information to deploy an SFTP file transfer server to any other Kubernetes Engine service.
For any comments or questions, don't hesitate to get in touch with us.
The diagram from this article is available on request.
Final result
Once completing the steps in this guide, you will have an SFTPPlus application with the following services:
- Port 10020 - HTTPS web based management console
- Port 443 - HTTPS end-user file management service
- Port 22 - SFTP end-user service
All these services will be available via your cluster IP address.
The local files for each pod should be considered disposable. They are lost once the pod is terminated.
To persist the SFTPPlus configuration and end-user data, an external volume is used.
The HTTPS web based management console is accessed in read-only mode, as the configuration is managed via the cluster infrastructure and not using the SFTPPlus configuration management functionality.
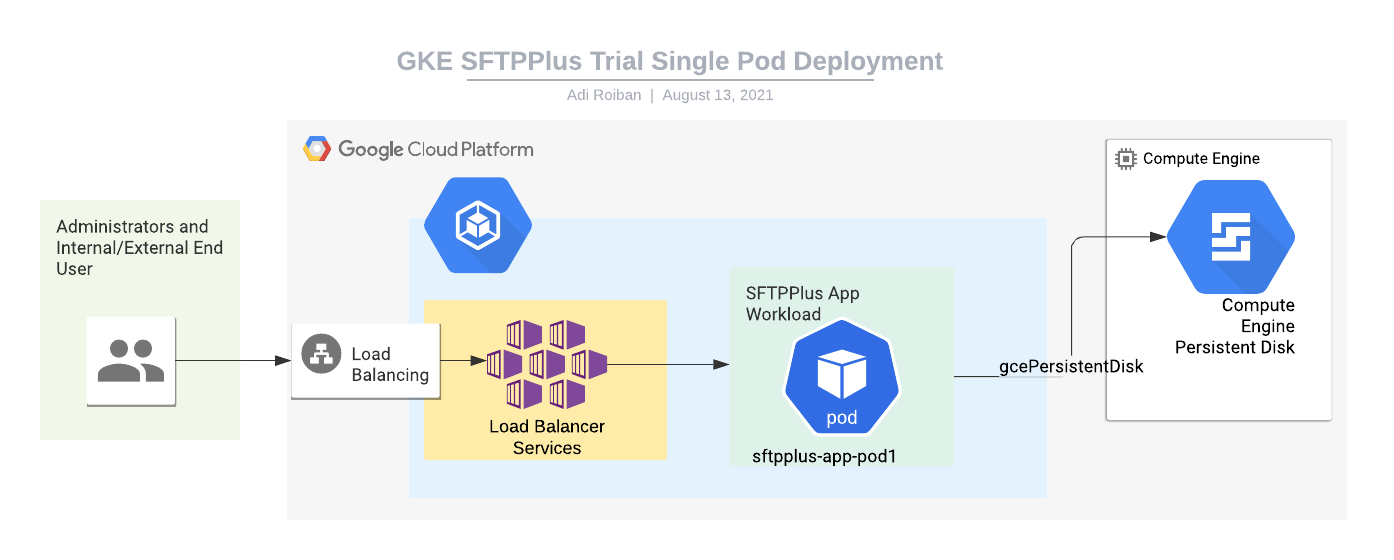
Moving parts
For implementing the SFTPPlus service we will be using the following parts:
- The SFTPPlus Trial container image hosted at Docker Hub.
- A Google Kubernetes Engine with at least 2 nodes, each node with a minimum of 2 GB of memory and 100GB of storage. The storage is used for the whole cluster, and it's not the dedicated storage required for SFTPPlus. This is a prerequisite for this article.
- A Google Compute Engine persistence disk created outside of the cluster. To simplify the configuration, the disk is attached directly to the pod, without creating a separate persistence volume and persistence volume claim.
- A Kubernetes Load Balancer service for connecting the application to the Internet. Instructions for creating this are provided below.
- A Kubernetes workload for hosting the SFTPPlus application. Instructions for creating this are provided below.
Kubernetes load balancer and Internet access
This section describes the process of creating a Kubernetes Load Balancer service to allow external Internet access to the SFTPPlus application.
It assumes that you will upload the following YAML file named sftpplus-service.yaml to your cloud console:
apiVersion: v1
kind: Service
metadata:
  finalizers:
  - service.kubernetes.io/load-balancer-cleanup
  labels:
    app: sftpplus-app
  name: sftpplus-app-load-balancer
  namespace: default
spec:
  externalTrafficPolicy: Cluster
  ports:
  - name: 10020-to-10020-tcp
    nodePort: 30500
    port: 10020
    protocol: TCP
    targetPort: 10020
  - name: 443-to-10443-tcp
    nodePort: 32013
    port: 443
    protocol: TCP
    targetPort: 10443
  - name: 22-to-10022-tcp
    nodePort: 32045
    port: 22
    protocol: TCP
    targetPort: 10022
  selector:
    app: sftpplus-app
  sessionAffinity: None
  type: LoadBalancer
The file can be updated to add more ports if required or export the services using different external ports.
With the YAML file available you can create the service by using the following command:
kubectl create -f sftpplus-service.yaml
Application pods
This section describes the creation and configuration of a workload that will run a single pod hosting the SFTPPlus application.
It assumes that you will upload the following YAML file named sftpplus-workload.yaml to your cloud console:
apiVersion: apps/v1
kind: StatefulSet
metadata:
  labels:
    app: sftpplus-app
  name: sftpplus-app
  namespace: default
spec:
  replicas: 1
  serviceName: "sftpplus-app"
  selector:
    matchLabels:
      app: sftpplus-app
  template:
    metadata:
      labels:
        app: sftpplus-app
    spec:
      terminationGracePeriodSeconds: 10
      containers:
      - image: proatria/sftpplus-trial:4.12.0-cloud
        imagePullPolicy: Always
        name: sftpplus-trial
        env:
        - name: SFTPPLUS_CONFIGURATION
          value: /srv/storage/configuration
        resources: {}
        securityContext:
          privileged: true
        terminationMessagePath: /dev/termination-log
        terminationMessagePolicy: File
        volumeMounts:
        - mountPath: /srv/storage
          name: sftpplus-disk

      dnsPolicy: ClusterFirst
      restartPolicy: Always
      schedulerName: default-scheduler
      securityContext: {}
      terminationGracePeriodSeconds: 30
      volumes:
      - gcePersistentDisk:
          fsType: ext4
          pdName: sftpplus-disk
        name: sftpplus-disk
You should replace sftpplus-disk with the name of the manually created Compute Engine disk.
The content of the cluster secret is available inside /opt/sftpplus/secrets. The cluster ConfigMap is available inside /opt/sftpplus/configuration.
Each key of the Secret or ConfigMap object will be converted into a file with the same name as the key name and the same content as the key content.
With the YAML file available in the cloud console, you can create the workload by using the following command:
kubectl create -f sftpplus-workload.yaml