
WebAdmin Documentation
Web Admin GUI
This chapter presents the Web Administration component of the SFTPPlus system. Each subchapter will treat a sub-component of it, but the interconnection and dependencies among them will also result from the further description, in order to understand the system in details and also as a whole.
This component is accessible through a graphical user interface provided by the application, screenshots will be included in this document to better illustrate the described ideas.
System Initialization
After the system has successfully been installed and the configurations have been completed with the help of the first page, the connection to the database is initiated.
In case the specified database is empty, the tables and the Hibernate sequence will be created; or updated if they partially exist.
Also, the following default entries will be created, which cannot be deleted through the application:
- the default server - server name: System
- the default user - username/password: System/password
- the default maintainer - username/password: System/password
- the default system record - name: System
The server “System” is the server used by the web client system.
The server “System” is added by default to the user “System”, but it is also possible to delete it.
A folder named “System” is created in the default storage location specified on the configuration page, serving as the home folder of the default user “System”. In case there are no read/write permissions, a message will be displayed notifying about the folder creation failure.
A more detailed description of these will be found in the following sections.
Logging on
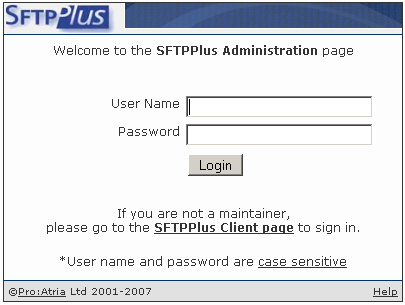
Logging on can be done with maintainer accounts, or by using the login information of the default maintainer: System/password, in case no other maintainers exists. Please change this password for security reasons.
The login information entered is case sensitive.
If incorrect data is entered or username and password do not match, error messages are displayed.
It is possible to navigate to the web client page by accessing the link at the bottom of the login page.
The menu links are not accessible until logging on has not been performed.
The application will redirect to the login page in the following cases:
- when configuring and starting the application for the first time
- when performing a log out operation a corresponding notification message will be displayed, showing also the duration of the session that just ended
- if the system administration idle time has expired a corresponding notification message will be displayed, showing also the duration of the session that just ended
- if the client side session has expired
When an automatic logout is generated due to system idle time expiration or in case a page is accessed but before authentication: the last visited page is displayed after logging on again in the same browser.
Home page and general page structure
PHP System Upgrade
In the case of PHP version of SFTPPlus Webadmin there is an option to upgrade from a previous SFTPPlus installation. At the first login you will see a page similar with this one:
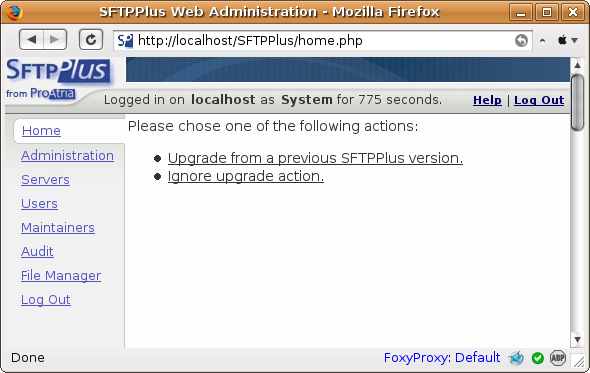
If you want to ignore the upgrade procedure click on the “Ignore upgrade action” link.
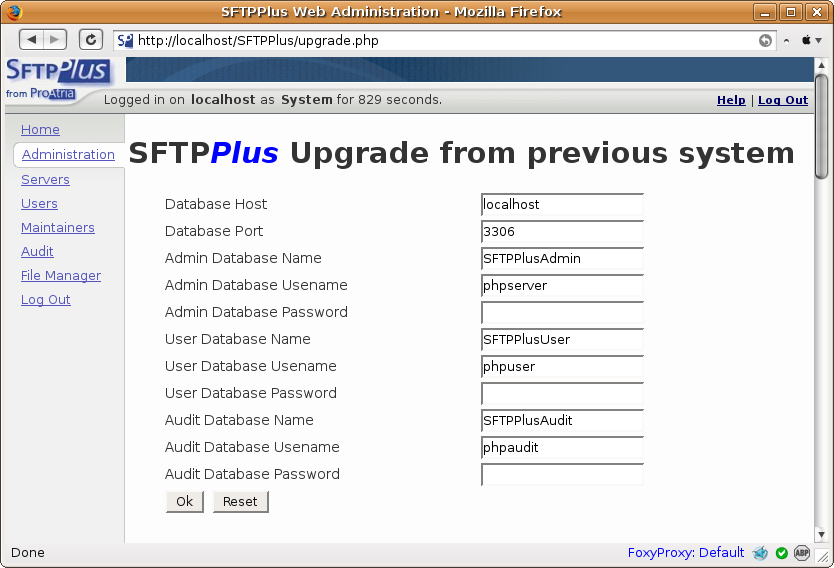
To initiate the upgrade procedure click on the “Upgrade from a previous SFTPPlus version”. You will see a page similar with this one:
Components of Pages
All the pages contain the following components: header, footer and menu.
- Header
The header component contains the SFTPPlus logo and general information about the login time and user.
- Menu
The menu component contains links to the pages of the applications.
- Help
Every page contains a link to the help documentation, showing the related paragraph.
- Logout
Log out from the system.
SFTPPlus Server Home Page
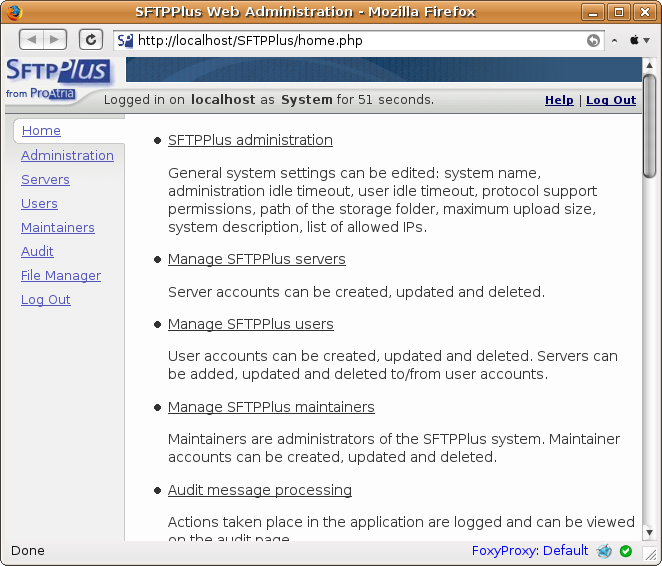
After logging on, the home page is displayed, which contains links to the other pages of the application.
Administration
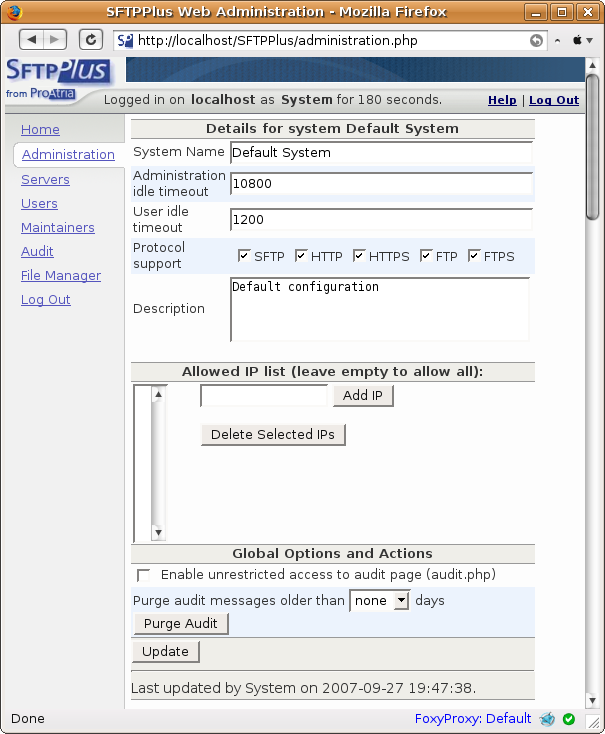
The administration page contains settings concerning the whole system. The default values are set when the system is initiated; later all these values can be changed.
- System name
Default value: “System”.
- Administration Idle Timeout
Default value: 10000 seconds.
If the web admin application is left idle for a number of seconds above this value, the system will log out.
- User Idle Timeout
Default value: 1000 seconds.
If the web client application is left idle for a number of seconds above this value, the system will log out.
- Protocol Support
Default: each protocol support is enabled.
Enabling/disabling the protocol supports on the administration page affects the followings:
- users
- servers
- user - server entries
In case a protocol support is disabled, the corresponding column in the tables of the previously mentioned entities will be disabled and their values automatically reset.
If a protocol support is (re-)enabled, all the checkboxes on these columns will be possible to be checked or left unchecked.
- Storage Folder
Default: the folder set on the initial configuration page at first run of the system.
If the storage folder path is changed and the new folder provided does not exist, it will be automatically created, unless the user has no read/write permissions for the parent folder.
The functionality of this folder will be described in the File Manager chapter.
- Maximum Upload Size
The maximum size of the files to be uploaded, measured in MB, can be set here.
The value -1 stands for no limit.
- Description
Default: empty.
An optional description can be provided for the system record.
- General Pre/Post-Transfer Process Execution
Default: empty.
Pre/post values can be set in the admistration, the server and the user-server pages. After installing the system, these values will be empty by default, and can be changed at any time. These values are executed before respectively after the execution of different transfer operations in the system.
The pre/post values set in the administration page will be shown as default when adding new servers to the system. These values can be changed at the moment of addition of a new server, or later from the server details page.
- Enable/Disable Unrestricted Access toAudit Page
Default: disabled.
When enabled, anyone can access the audit page, without being authenticated. Operations available on the audit page can be performed ( filtering audit entries, navigating between audits, setting the number of audit entries displayed on a page ). There is no access to the audit details page, neither to any other pages of the application.
When disabled, the audit page can not be viewed only after authentication.
- Purge Audit Messages
Default: none.
Audit messages can be purged (deleted from the database) using this functionality. The number of days for which the audit entries are purged can be selected, meaning that entries created earlier then that number of days are deleted.
If ‘none’ is selected from the combo box as the number of days for purging, no action will be taken. This entry is introduced for security reasons, in case the ‘Purge’ button is accidentally clicked.
- Allowed IP List
Default: empty.
IP values can be added or removed to/from the allowed IP list.
In case there are no IP values added to the list, users with any IP can log on to the web client system. If at least one IP value is added to the list, only clients with their IP values equal to the value(s) added to the allowed IPs list can log on to the web client system.
Servers
Servers of this system may have the following protocols enabled (for local or global users): SFTP, HTTP, HTTPS, FTP, FTPS. If both local and global permissions are enabled, the latter overrides the first one, meaning that it will not be possible to log on locally.
An existing server has to be registered to the SFTPPlus system in order to make it possible to log on to it.
The clients logging on to these servers can be global or local clients. Global clients are authenticated by verifying their username and password. Local clients have local usernames and passwords that are not kept in the application database.
Clients can log on to a server with a given protocol permission enabled, only if the followings hold:
- they have this server added to their account, which has the needed permissions enabled for the user
- the users themselves have the same permission(s) enabled as mentioned above
The “System” server provides the HTTP or HTTPS service for the global users. There are no local users for HTTP or HTTPS service.
List Servers
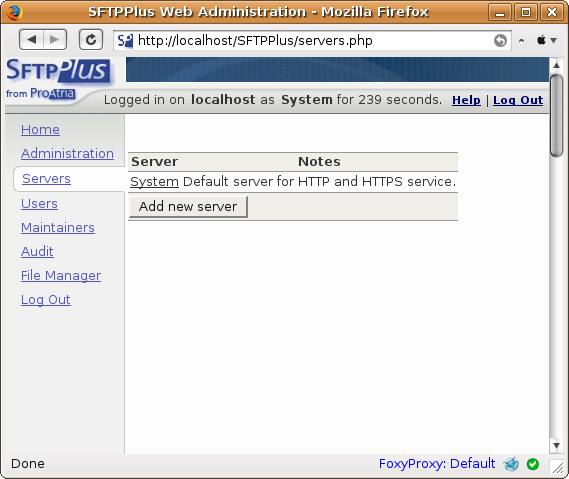
The list of the servers is displayed together with their descriptions.
Clicking on a server name will display the page containing its details.
Disabled servers can be shown or not in the list of servers. This can be changed with the help of the ‘Also show disabled servers’/’Hide disabled servers’ button. Disabled servers are noted by displaying the string ‘[disabled]’ in the server notes.
Create Server
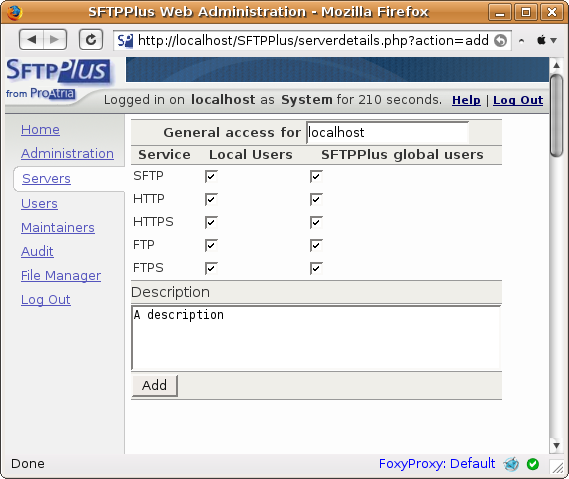
The server name is mandatory and it can contain only alphanumerical characters (a-z, A-Z, 0-9) and the ”.” character; otherwise a notifying message will be displayed.
Server names must be fully qualified domain names (FQDN) or valid IP values.
The protocols disabled on the administration page will be disabled for each server also.
The pre/post values set in the administration page will be shown as default when adding new servers to the system. These values can be changed at the moment of addition of a new server, or later from the server details page.
Server Details
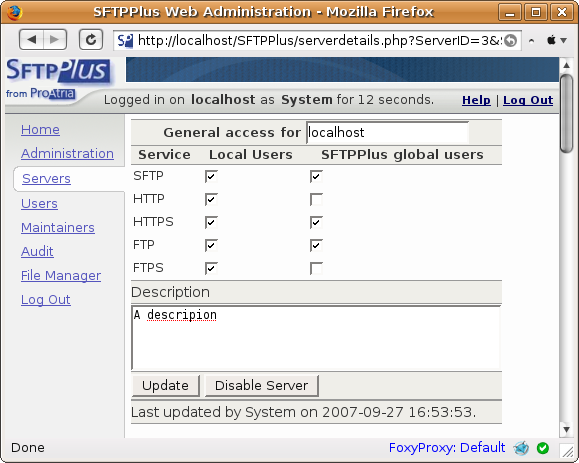
The default “System” server cannot be deleted and initially no protocols are enabled for it.
For any server name change, the same name validation rules apply: only alphanumerical and ”.” characters are allowed.
Only the permission fields enabled in the administration page will be possible to be enabled for a server.
Servers can be disabled or enabled by using the ‘Disable’/’Enable’ button. If a server is disabled, all the protocol accesses are disabled for it. If the server ‘System’ is disabled, it is not possible to log on to the SFTPPlus WebClient system.
Servers that are disabled will not be deleted from the database, in case they are enabled again, they will keep their original settings. Disabled servers are not displayed in the list of the servers that can be added to users, neither in the list of the servers that are already added to a user. This means, the user-servers added to a user will not be deleted, but disabled until the respective server will be enabled again, if it is the case.
The pre/post values set for a server, will be shown as default when adding new user-server associations to a user. These values can also be changed at addition time, or later from the user-server details page.
Users
The SFTPPlus system supports two types of users:
- Local users
- Global users
Both types of users can log on to the SFTPPlus web client system using their accounts created by maintainers through the SFTPPlus web administration application.
Local users don’t need to be registered on the SFTPPlus system in order to log on locally to servers which have the corresponding protocols enabled for local users. These users are authenticated using their local usernames and passwords, there is no need to set special passwords in the database, and they have by default permissions for all the protocols. For disabling permissions for a local user, the following procedure can be done:
- create a SFTPPlus user account
- in the user details, add the server to which logging on is desired
- disable the permissions for this user-server which are desired to be disabled
Global users, on the other hand, do need to be registered on the SFTPPlus system (added to the database this way) in order to log on globally to a server. This server needs to be added to the user from the “user details” page and have the corresponding global permissions enabled. This involves having both the server and the user having those permissions enabled also.
In other words, local users initially have all the permissions enabled, and in order to deny some permission, the corresponding servers need to be added and this permission disabled; global users initially have no permissions enabled, and in order to enable some, servers need to be added and the corresponding permissions enabled.
Logging on to the web client system can be done by using global user accounts.
A global user can log on to the web client system in case at least one of the HTTP or HTTPS global permissions is enabled and the “System” server added to its account also has at least one of the HTTP or HTTPS permissions enabled.
By creating a user, a folder named the same way as the new user will be created in the default storage folder defined in the administration page. In case there are no read/write permissions, a message will be displayed notifying about the folder creation failure, but the user account will still be created.
List Users
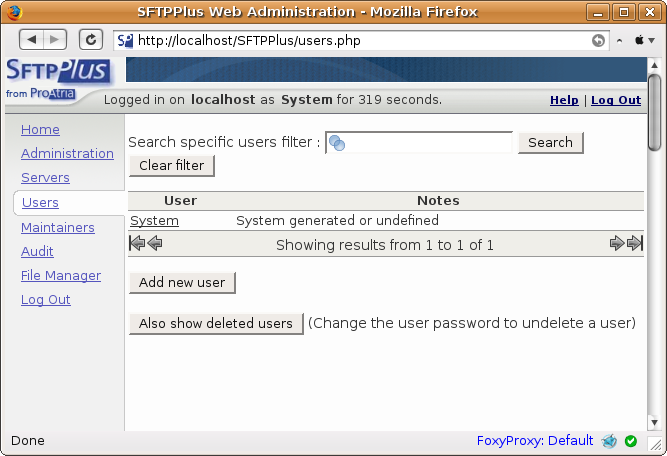
The list of the users is displayed together with their description.
Clicking on a user name will display the page of its details.
Searching among the users can be done with the help of the search field, which is not case sensitive and matches results containing or matching the search string entered.
Disabled users can be shown or not in the list of users. This can be changed with the help of the ‘Also show disabled users’/’Hide disabled users’ button. Disabled users are noted by displaying the string ‘[disabled]’ in the user notes.
Create User
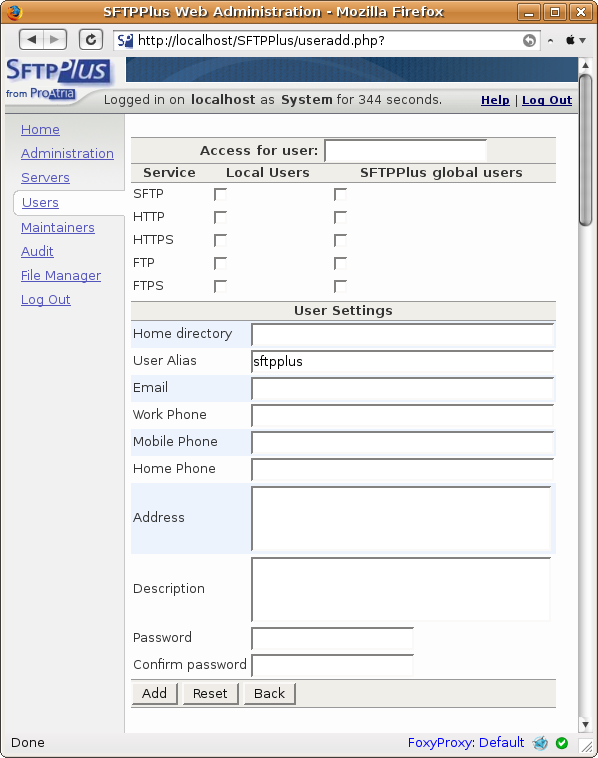
The permissions for a web client are defined: the differentiation is made between local and global user permissions. Clients can use only protocols that are being enabled for them i nthe application.
The home folder for a local user is the storage place used in the web client application. This folder is overriden for global users; in this case the home folder is the one named after the user name of the web client situated in the storage folder defined on the administration page.
The user name is mandatory and it can contain only alphanumerical characters (a-z, A-Z, 0-9) and the ”.” character; otherwise a notifying message will be displayed. It is used when logging on to the web client system globally.
The user alias is by default “sftpplus”, because a user account with this username is created by default on every machine at installation time. This name is used when logging on locally to the web client system. If no other user-account log-on information is known by a client who wants to log on to the web client system, this default alias can be used. The user alias can be changed anytime by a maintainer.
Personal data can also be defined here for users: email, work phone, mobile phone, home phone, address, and a description of this user. The password fields are also mandatory, in case they are left empty, or do not match, a message will be displayed.
The protocols disabled on the administration page will be disabled for each user also.
User Details
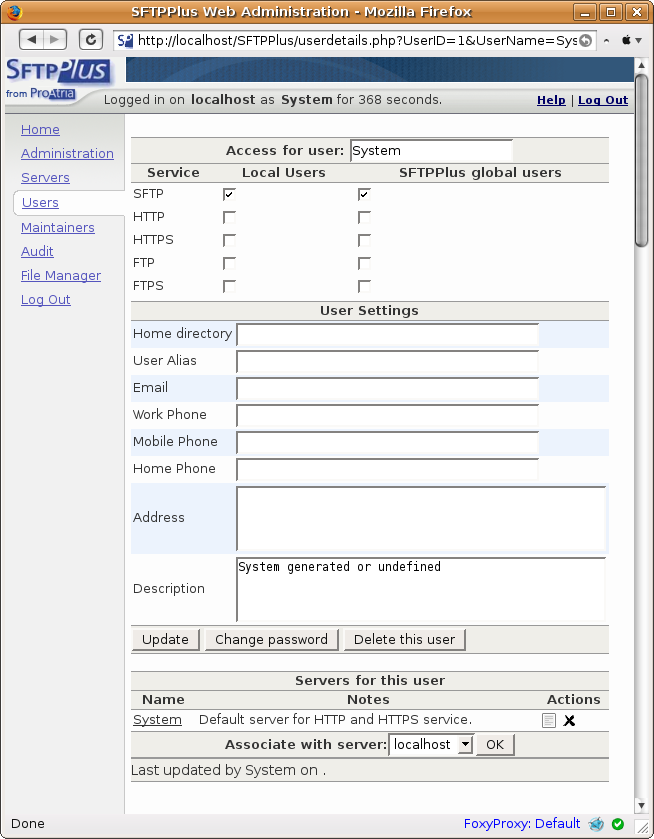
The default “System” user cannot be deleted and its default password is: “password”. Please change this password for security reasons.
The user name cannot be changed, because of the security aspect implemented when creating the password and also to avoid renaming the storage folder of the user.
Only the permission fields enabled in the administration page will be possible to be enabled for a user.
Adding servers to a user will be discussed in the User-Servers chapter.
Users can be disabled or enabled. If a user is disabled, its account cannot be used to log on to the SFTPPlus WebClient system. The user ‘System’ cannot be disabled.
Users that are disabled will not be physically deleted from the database. In case they are enabled again, they will keep their original settings: user account settings and user-servers added with their settings.
Users can be enabled by changing their passwords.
User Password Change

The password change for a user can be done by accessing the page below.
The maintainer has the right to change the password for a user without knowing the user’s old password.
Error messages will be displayed in the following cases:
- a field is left empty
- the new passwords entered do not match
If the password of a disabled user is changed (set), the user will be enabled.
User - Servers
Adding servers to user accounts makes it possible to log on to these servers. Users cannot log on to servers that are not added to their accounts.
List Servers for User
The list of the servers for a user is displayed in a table together with their descriptions on the user details page. Clicking on a user-server name will display the page containing its details.
Below this table there is a combo box containing the names of all the servers in the system and these can be added to the users.
In case all the servers have been added for a user, a notifying message will be displayed instead of the combo box.
Deleted users can be shown or not in the list of users. This can be changed with the help of the ‘Also show deleted users’/’Hide deleted users’ button. Deleted users are noted by displaying the string ‘[deleted]’ in the user notes.
Add Server to User

The checkboxes standing for the different protocol supports are disabled in the following situations:
- if the corresponding protocol support is not enabled for the respective server
- if the corresponding protocol support is not enabled for the respective user account
- if the corresponding protocol support is not enabled in the administration page (this way this protocol support will automatically be disabled for all the users and servers also)
The checkboxes that are not disabled can be checked (to enable the protocol support) or left unchecked (leave the protocol support disabled).
The pre/post values of a server, will be shown as default when adding new user-server associations to a user. These values can be changed at addition time, or later from the user-server details page.
User - Server Details
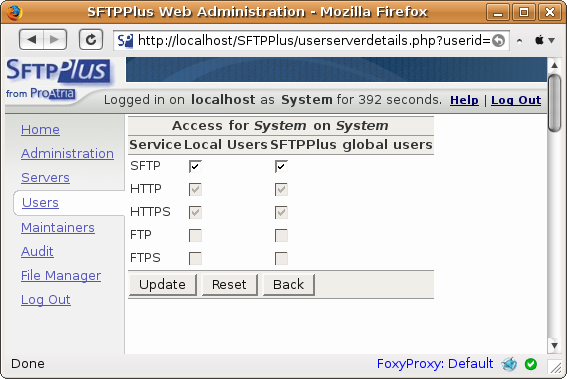
The “System” server is added by default to the “System” user. This server supports HTTP(S) protocols, these permissions are enabled by default and cannot be changed. This user-server can be later deleted from the application.
The protocol support and pre-post process commands can be changed for user-servers.
Maintainers
Maintainers are administrators of the SFTPPlus system. They manage the system using the SFTPPlus web administration site described in this document. Maintainers are users with administration rights having access to all what is contained in the web administratin GUI presented in this chapter, including their own accounts and accounts of other maintainers.
List Maintainers
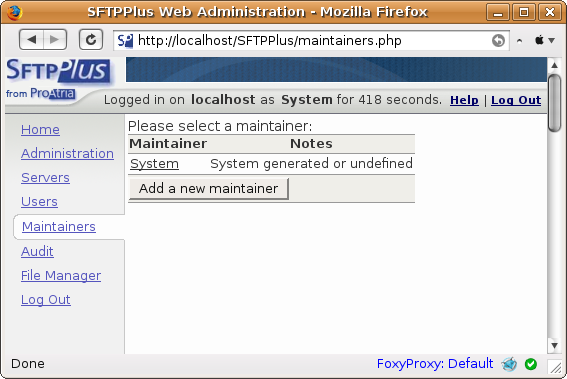
The list of the maintainers is displayed together with their description. Clicking on a maintainer name will display the page of its details.
Disabled maintainers can be shown or not in the list of maintainers.
This can be changed with the help of the ‘Also show disabled maintainers’/’Hide disabled maintainers’ button. Disabled maintainers are noted by displaying the string ‘[disabled]’ in the maintainer notes.
Create Maintainer
The maintainer name is mandatory and it can contain only alphanumerical characters (a-z, A-Z, 0-9) and the ”.” character; otherwise a notifying message will be displayed.
The password fields are also mandatory, in case they are left empty, or do not match, a message will be displayed.
Logging on to the web admin system can be done by using the maintainer name and password provided through this page.
The permissions for each maintainer can be set with the help of the check boxes in the ‘Permissions’ field:
- If none of the check boxes is enabled, the respective maintainer has no permission to access any page of the application: it is possible to log on to the application, but only the home, logout and the help links will be displayed, the home page being empty.
- If the ‘Unrestricted access’ is enabled, the maintainer has access to all of the application’s pages: after logging on, all the menu points are displayed, and there is access to them.
- If one or more permissions of the ‘Add/Delete/Modify Users’ ; ‘Add/Delete/Modify Servers’ or ‘View Audit Page’ are enabled, and the ‘Unrestricted access’ permission is disabled, the user has access only to the enabled page(s).
- If the ‘Unrestricted access’ is enabled, it doesn’t matter if any other permission is also enabled or not, the maintainer will still have unrestricted access to the application: the home, administration, servers, users, maintainers, audit, file manager and logout links will be displayed and accessible.
These permissions can be changed at any time for any maintainer by any maintainer that is logged on. In case a maintainer changes its own permisisons, the changes will take effect starting from the next login.
Maintainer Details
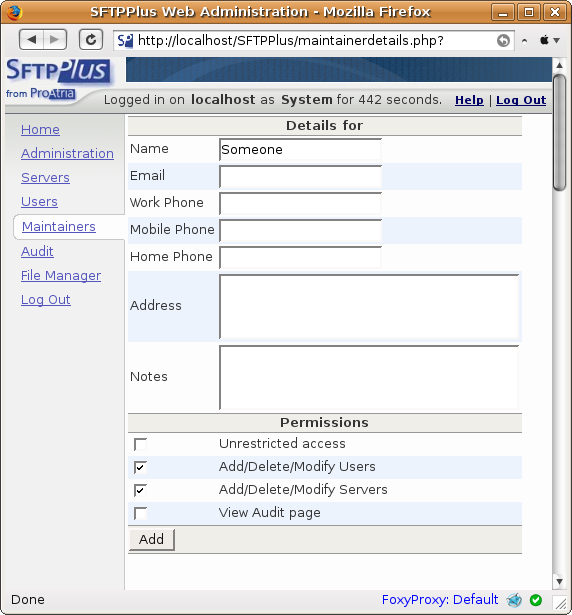
The default “System” maintainer cannot be deleted and its default password is: password. Please change this password for security reasons.
The maintainer name cannot be changed, because of the security aspect implemented when creating the password.
Each maintainer has rights to access the storage directories of each user situated in the default storage folder specified in the administration page. This aspect will be presented more thoroughly in the File Manager chapter.
Maintainers can be disabled or enabled by using the ‘Disable’/’Enable’ button. If a maintainer is disabled, its account cannot be used to log on to the SFTPPlus WebAdmin system. The maintainer ‘System’ cannot be disabled.
Maintainers that are disabled will not be physically deleted from the database. In case they are enabled again, they will keep their original settings.
Maintainer Password Change
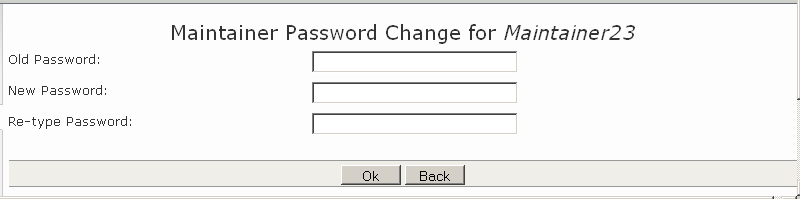
The password change for a maintainer can be done by accessing the page below. Error messages will be displayed in the following cases:
- a field is left empty
- the old password is incorrect
- the new passwords entered do not match
Audit
List Audits
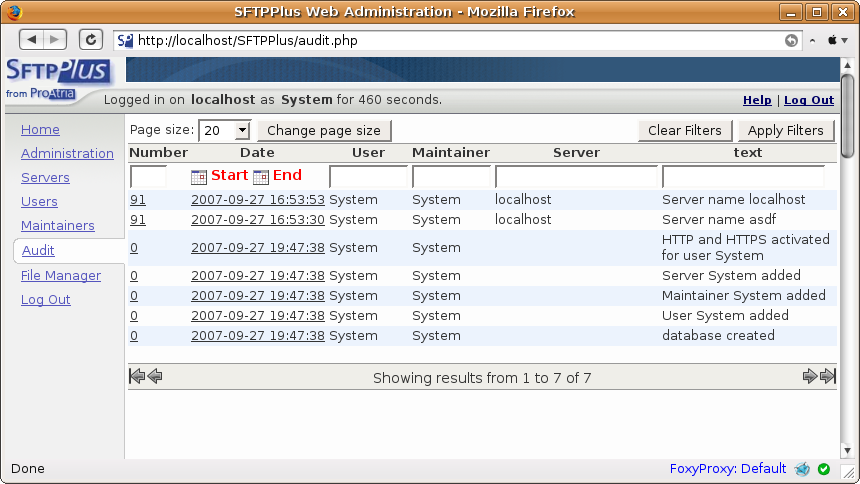
Several actions that take place in the application are logged and displayed on the audit page contained in a table. Actions that are logged are the following ones:
- logging in/out to/from the application
- create new record
- update an existing record
- delete a record
- change password
- disabling/enabling accounts
It is possible to navigate in this table, and also to set the number of entries displayed on a page with the help of the combo box at the bottom of the page.
- Audit Filtering
- General Filtering
Filtering the audit entries is possible using the text boxes at the top of each column.
The filter values entered are case sensitive. For filtering numbers, the exact number filter has to be input, no partial matches are done (for example, 2 will not math the entry 92).
Multiple filters can be added at the same time or in turns. In these cases the intersection of the resulting filtered values will be obtained.
After setting the filter values, clicking on the “Filter” button will display the results.
To clear all the filters, the “Clear Filters” button has to be clicked. Also the page counter will be reset and the first page of the table will be displayed.
Date Filtering
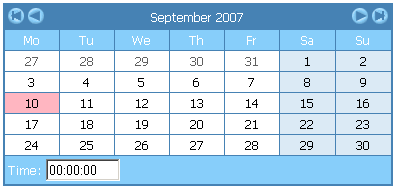
In order to filter the date column a start and an end date has to be selected with the help of the calendars displayed at the top of the Date column.
The default values of the start and end dates are:
- Start: the current date having the hours, minutes and seconds set to zero (00:00:00)
- End: the current date having the hours, minutes and seconds set to the current time values
In the same way, filtering can be done for a single day only, by defining the hours, minutes or seconds as different for the start and end timestamps.
If no date has been set, the color of the Start and End texts will be red and the default values will be considered, otherwise they will turn to green and the chosen timestamps will be considered when filtering.
Clearing the date filters is done in the same way as in the case of the general filtering.
Audit Details

Details about an audit entry are displayed in the form of a table. It is possible to navigate back and forth among the audit entries.
File Manager
Java Version
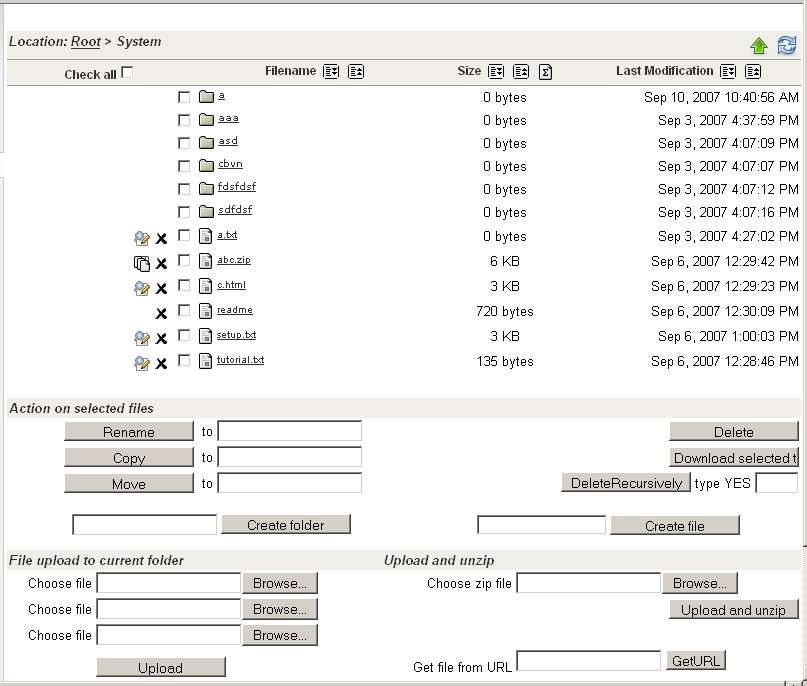
General Description
The contents of the root folder will be shown when accessing the File Manager page. The root folder is the one defined as the default storage folder in the administration page and all the storage directories of the users will be visible to all the maintainers.
It is not possible to access or modify a file or folder if there are no read/write permissions to allow that.
Several operations can be done on this page; these will be done on the files or folders selected by the checkboxes.
File/folder operations:
- rename;
- copy;
- move;
- delete: can be applied for files or empty folders
- zip download: downloads the selected entry named by default: SFTPPlusDownload concatenated with the current date, but this name can be changed at save time;
- delete recursively: for security reasons “YES” has to be typed (case sensitive) and the selected folder with all of its files and subfolders will be deleted recursively;
- create new folder: the new folder will be created in the folder where the maintainer is currently situated;
- create new file: a file of any dimension can be created. In case it has a .zip extension, the “unzip” icon will appear on its right, or an “edit” icon if it has an editable text file extension.
Upload operations:
- one or more files can be uploaded from the disk simultaneously
- file upload and unzip to current folder
- upload from a URL
By clicking on a file/folder name, it is possible to navigate or view the file contents. By right-clicking on an entry, it is possible to perform link operations provided by the operating system and the browser.
Files can be sorted by their names in ascending or descending order by clicking on the corresponding icon. Also, they can be sorted by their size or modification date.
The folder tree size can be viewed for a selected folder.
In case operations are not performed correctly or no entries are selected for performing an operation, error messages are displayed to let the user know about the problem.
PHP Version

Edit Text Files
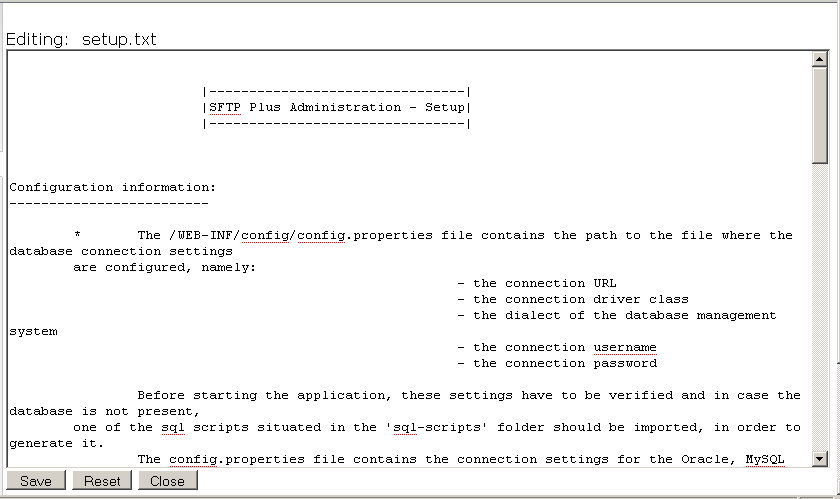
Editing text files is possible by clicking on the “Edit” icon, which appears on the left of the editable files.
After editing, the changes made can be saved or reset.
Help
This is available at any time for the users.
It can be accessed from any of the application’s pages by clicking on the link situated at the top-right corner of the application’s current page.
According to which page is the help document accessed from, the corresponding paragraph will be displayed at access time.