5.6. SFTP / SCP Usage
5.6.1. Introduction
This page contains information about using the SFTP / SCP file transfer service.
Both SFTP and SCP operate over the Secure Shell (SSH) cryptographic network protocol version 2. Only SSH version 2 is supported by SFTPPlus.
The SCP implementation is based on reverse-engineering the scp command tool provided by the OpenSSH project.
The SFTP implementation is based on the SSH File Transfer Protocol draft 3 draft-ietf-secsh-filexfer-3 specification.
The SFTP and SCP protocols are layered on top of the generic SSH protocol for which the general architecture is described in RFC 4251
The following authentication methods are supported, as specified in RFC 4252 : password and publickey.
5.6.2. File open mode
The SFTP protocol is more like a remote file system protocol and does not provide high level commands for file upload or download. Instead, it provides a wide range of primitive operations for remote files like open, read, write and close commands.
When a file is opened or closed, the emitted event contains the opening mode of the file. The following modes are possible:
- reading
- reading with append
- writing
- writing with append
- reading and writing
- reading and writing with append
To help filtering the common operations, which are read and write, dedicated event IDs are emitted when the file is closed while being opened in read-only or write-only mode.
5.6.3. SSH Key Authentication
SFTPPlus supports SSH key authentication by reading SSH public keys in OpenSSH format.
SSH keys are composed of the following 2 parts:
- public
- private
The server only needs to know about the public part of a SSH key. As the name suggests, the public part can be shared with anyone and does not require to be kept secret. You can send it over unsecured communication channels like email (SMTP) or HTTP.
The OpenSSH public key is defined in the following format:
KEY-TYPE KEY-CONTENT [KEY-COMMENT]
- KEY-TYPE can be ssh-dsa or ssh-rsa
- KEY-COMMENT is an optional text and needs to be placed on the same line.
Example:
ssh-rsa AAAAB3_CONTENT_OF_THE_KEY_OqLrL8bfLCu/ description
The private part should always stay on the client side and never be sent to the server or to other parties. In terms of protecting the private part, you should follow the same procedures as for a plain text password.
Example of unencrypted OpenSSH private key:
-----BEGIN RSA PRIVATE KEY-----
MIICWwIBAAKBgQC4fV6tSakDSB6ZovygLsf1iC9P3tJHePTKAPkPAWzlu5BRHcmA
MORE-KEY-CONTENT-HERE
LqHYUobNanxB+7Msi4f3gYyuKdOGnWHqD2U4HcLdMQ==
-----END RSA PRIVATE KEY-----
To improve security while moving private SSH keys, there is the option to encrypt them, using a password. Note that the password is only used for storing the key on disk. When the key is used by an SSH application, it needs to be decrypted first.
For non-interactive SSH applications (e.g. SSH / SFTP / SCP server or automated SSH / SFTP / SCP client), where there is no person to type the password from memory, in order for the application to read the key, it needs access to the plain text password. Since the password is stored together with the associated encrypted key, this leads to the same security level as the unencrypted key.
Example of encrypted OpenSSH private key:
-----BEGIN RSA PRIVATE KEY-----
Proc-Type: 4,ENCRYPTED
DEK-Info: AES-128-CBC,BCD9AB5C68DD1924FF2A1A54BE2A7BF4

RAHH7yMbPk/vrhT5jkSDGIUdH+nG0OQpeSWcQXd4JJ6pqdJh/cw/havtxlHFp1yz
MORE-KEY-CONTENT-HERE
Pkf+23OGZln2dLz/pkJkiRRzmsWgT2hUv/EK4NYRQq1kEAXLf3J6xZqLlR3ZBLJm
-----END RSA PRIVATE KEY-----
In a secure environment, the client will generate the private and public keys on the same machine which uses them, and it will send only the public part to the server. This way, the private part never leaves the machine on which it is used, greatly reducing the risk of revealing the key.
Putty Key format (.ppk) and RFC 4716 format are not directly supported, but you can use the SSH key conversion tools provided by the Local Manager to convert those keys into OpenSSH public key format.
5.6.4. Configuring SSH key-based authentication on the server
An account can have both password and ssh keys authentication methods enabled at the same time. At connection time, the SSH server and client will perform a negotiation step and the server will use only one method for authenticating the session.
Password authentication can be disabled for an account, in which case the server will force the client to use SSH keys for authentication.
An account is configured with one or many public SSH keys (a list). When the same account is used to connect from multiple machines, you will want to generate one pair of SSH keys for each machine, so that a private key never leaves the machine on which it is used.
For each account there is an associated local file containing on each line the public SSH keys in OpenSSH public key format accepted during the authentication.
To add a public key, you will have to copy the content of the public key from the file usually named KEY_NAME.pub and paste it on a new line into the file containing the list of allowed SSH keys.
Note
There is no restriction to having an 1:1 relation between an account and the list of public SSH keys. The same list (i.e. same local file) can be associated with multiple accounts.
There are two main approaches for configuring SSH keys for an account:
- Only the server’s administrators can manage the list of allowed SSH keys. In this case the file containing allowed SSH keys is stored somewhere outside the account’s home folder.
- Allow an account to have access to its own list of allowed SSH keys. Server administrators can still manage the list. The file with the list of allowed public SSH keys is stored inside the account’s home folder. This is similar to OpenSSH configuration, where the list is stored in .ssh/authorized_keys file.
5.6.4.1. Local Manager GUI configuration
To configure the list of allowed SSH keys for an account, follow these steps:
- Create a local file where public SSH keys associated with this account are stored. In our example, the file is located at c:\Users\sftp_access\John_keys
- Go to the account’s configuration page and enter the path in the Allowed SSH keys field.
Here is a screenshot with the above configuration:
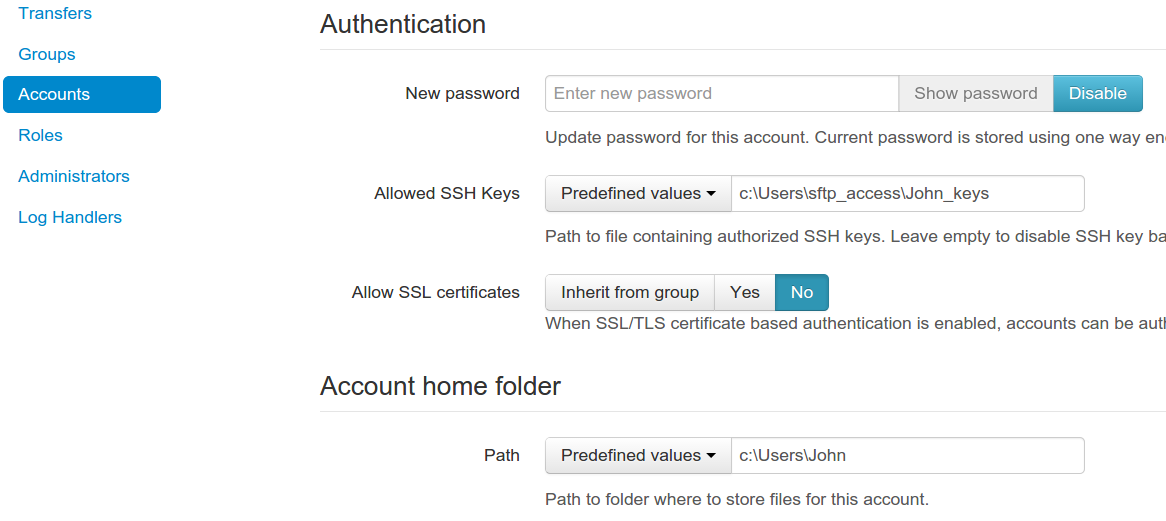
In our configuration, the account’s home folder is in c:\Users\John and it has no access to manage its own SSH keys.
5.6.4.2. Text file configuration
ssh_authorized_keys_path option from the configuration file specifies the path to the file containing the list of allowed SSH RSA/DSA public keys for each user. The configuration path can contain the ${USER} value as a placeholder for the actual user name.
For example, with the ssh_authorized_keys_path option set in the configuration file to value similar to the one below:
ssh_authorized_keys_path = /home/${USER}/.ssh/authorized_keys
when user john is authenticated, the server will look after the file located in /home/john/.ssh/authorized_keys.
To disable SSH key-based authentication, set this value to “Disabled”, as in the example below:
ssh_authorized_keys_path = Disabled