Documentation
3.1. Getting Started with SFTPPlus
3.1.1. Prerequisite
This page assumes you have been through the Installation section of our Documentation and have successfully initialized the default configuration.
3.1.2. Configuration items
Three different types of accounts are available in SFTPPlus:
Manager accounts - only for management operations
OS accounts - only for file transfer operations
Application accounts - only for file transfer operations
Accounts dedicated to file transfer operations have multiple Authentication Methods by which remote file transfer clients can be verified and given permission to perform file transfer operations.
Note that, by default, SFTPPlus will only allow operating system accounts
from the example-group1 or example-group2 OS groups.
You will need to update the configuration to match your target group or
groups.
3.1.3. Installation Adjustment
If you have installed the software correctly, and the software is running, then you should be able to log in to the Local Manager as the administrator configured during the initialization process.
Navigate to https://127.0.0.1:10020, enter those credentials, and you will see the local manager's status screen similar to that below. You can replace 127.0.0.1 with the IP addess of the system on which SFTPPlus was installed.
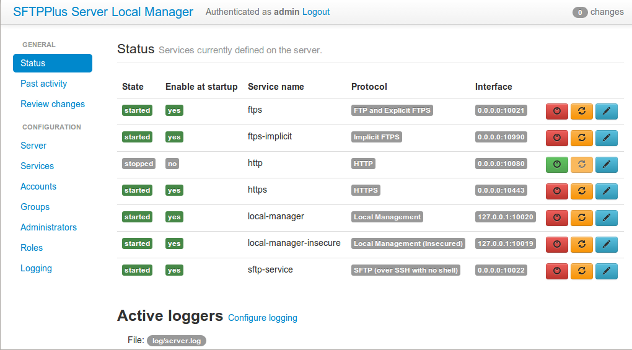
Once you have logged in and can access the Local Manager, you can begin the process of customizing your instance.
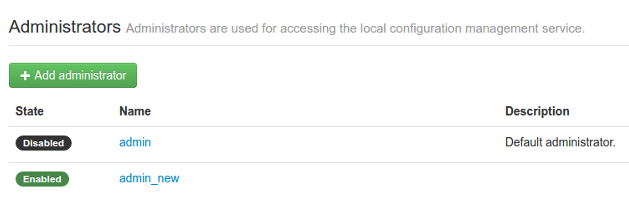
3.1.3.1. Changing the admin credentials
To change the default admin credentials, go to the Administrators section.
Select the account and edit both the username and password. Ensure to apply all changes.
To create a new administrator account, select Add administrator and configure its username and password. Ensure that this account is enabled and that the default admin account is disabled as shown in the screenshot below:
For security purposes, the default configuration has no accounts enabled for file transfer services. You can enable the sample accounts or create your own accounts.
3.1.4. Trying basic functionality
Once you have enabled an account and the software is running with default configuration, you can try both server-side and client-side basic functionality.
3.1.4.1. Server-side
You can access the HTTPS Service at https://127.0.0.1:10443 using your browser or the SFTP Service at 127.0.0.1:10022 using a SFTP client such as FileZilla or WinSCP to test the server and transfer a file.
Other Server side services are available as well.
3.1.4.2. Client-side
To try the client-site functionality please check the Transfers documentation. You can add a new transfer using the Local Configuration Manager or the configuration file.
3.1.5. Changing the default log file configuration
To prevent creating huge log files, the default configuration creates a log file which is automatically rotated at the end of the day.
To prevent data loss, the default configuration will not delete any rotated files. If no action is taken on installations experiencing high transfer volumes, this can lead to log files filling up available disk space.
For further details on changing the log configuration, please go to the Event Handlers section.
Please take the time to alter the log file configuration option to suit your needs.